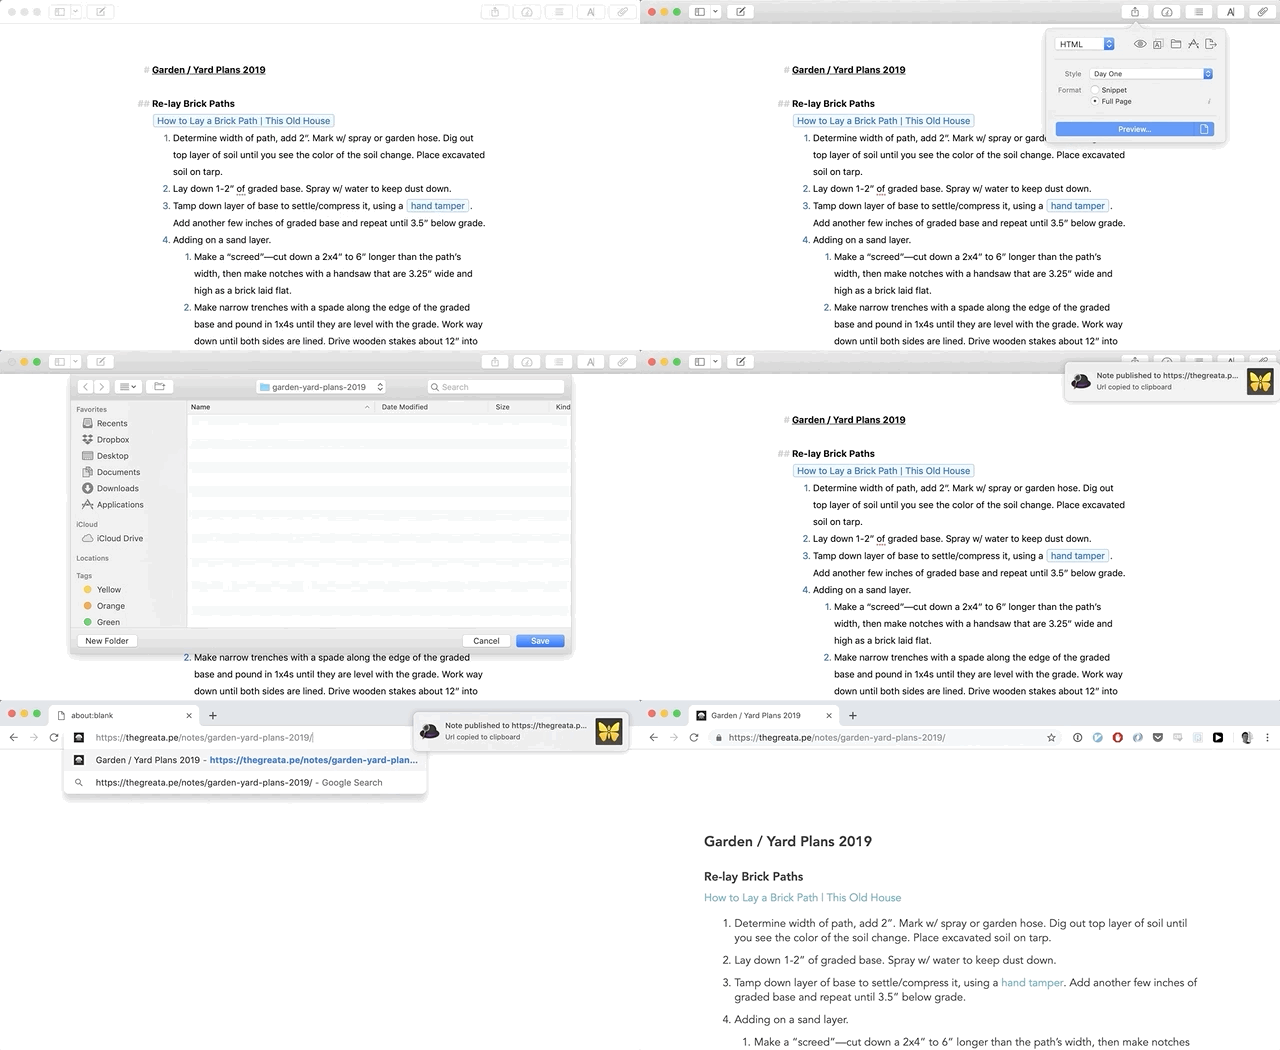
One of the things I’ve been working on for a few months now is taking more notes. Being intentional and systematic about writing down material I’m reading or learning has felt like a nice boost to my ability to make progress on a number of projects.
I’m using Ulysses on OS X as my main note taking program and it’s a really fantastic writing environment, but it’s slightly cumbersome to share my notes with other people. While Ulysses can export writing in a variety of file formats, I missed Notion’s ability to generate a public url for sharing a note with a single click. So, I built something to do that for Ulysses!
It’s an Alfred 3 workflow—all I have to do is hit Cmd-Space, type “pun” and hit Enter. The workflow then takes the currently open Ulysses note, automates the steps of exporting it to nicely formatted HTML, publishes it to a url on my site, and copies that url to the clipboard. It looks like this:

Details
Building this involved digging into a bunch of stuff I haven’t used before, and there are more than a couple moving parts:
Alfred workflows are a way to extend Alfred to be way more than an application launcher. They let you string together scripts (written in shell, Python, Ruby, or whatever) with user input from Alfred in really powerful ways. The workflow is what glues all these pieces together.
JXA: Javascript For Automation: as it turns out, Ulysses does have an API, but there’s no support for programmatically triggering an export of a sheet. So I needed a way to automate the actual button and menu clicking that you do in Ulysses to export as sheet as HTML. Luckily, Mac OS has long had good accessibility baked into its UI toolkits and you can script interactions with them via AppleScript and (since Yosemite) via Javascript! The docs on the JS specific side of things were a little sparse and most of the examples I found were in AppleScript (since it’s been around much longer), but I was able to cobble together something working. The JXA part looks like this:
function run() {
  ObjC.import('stdlib')

  var notesPath = $.getenv('notes_repository_path');
  var app = Application("Ulysses");
  var system = Application("System Events");
  var window = system.processes.byName("Ulysses").windows[0]
  var currentlyOpenNotes = window.scrollAreas[0].textAreas[0].value();
  var folderName = currentlyOpenNotes
    .split("\n")[0]
    .replace(/(^#\s*|\/)/g, '')
    .toLowerCase()
    .replace(/\s+/g, '-');
  var exportTargetPath = notesPath + folderName;
  $.system('rm -rf ' + exportTargetPath);
  $.system('mkdir ' + exportTargetPath);
  exportNotes(exportTargetPath);

  function exportNotes(path) {
    app.activate();

    var exportButton = window.toolbars[0].buttons.whose({description: "Quick Export"})[0];
    exportButton.actions['AXPress'].perform();
    try {
      exportButton.popOvers[0].buttons.whose({description: "Save to location"}).actions['AXPress'].perform();
    } catch(e){
      // even though this works and opens the button, it also seems to
      // raise a "message not understood" error. damned if I know why.
      // we seem to be able to just ignore it and move on.
      console.log(e.toString());
    }
    delay(1);
    system.keystroke("g", {using: ["shift down", "command down"]}); // bring up path entry dialog
    delay(1);
    system.keystroke(path); // enter path
    system.keyCode(36); // press return to select path
    delay(2);
    system.keyCode(36); // press return to begin export
  }
  return exportTargetPath;
}
Some resources I found helpful while figuring this part out:
- JXA Cookbook Great general resource for getting started with JXA.
- UIElementInspector for examining the UI element hierarchy inside Ulysses so I could figure how to drill down to the buttons and menus I needed to interact with.
- Workflow/environment variables in Alfred Alfred exposes the variable you set to each script environment a little differently, this is a great guide to each one, including JXA.
With the HTML exported, the rest is a fairly simple shell script. I use Github Pages to host this blog, so publishing new pages is just a matter of committing them and pushing to Github. The script adds the exported files, pushes them to Github, generates the url where they’ll be accessible and copies it to the clipboard.
#!/bin/bash
pushd $notes_repository_path > /dev/null

git status | grep 'nothing to commit' > /dev/null
if [ "$?" -eq 0 ]; then
  echo "No changes to publish";
else
	git add .
	git commit -m "Ulysses note publish `date`" > /dev/null
	git push origin HEAD > /dev/null
	git show HEAD | grep "+++ b.*index.html" | sed "s/\+\+\+ b\///" | sed "s/index.html//" | xargs -I{} echo "$site_domain/{}"
fi
Setup Instructions
Want to try this yourself?
Setup:
- If you don’t already have one, set up your Github pages site and make sure git is installed on your computer.
- Install the workflow (via Packal)
- Configure the environment variables in the workflow:
notes_repository_path: set to the absolute path of your Github pages repo where you want the notes html to be published.site_domain: set to the domain where the notes are hosted—this will be used to construct the url that’s copied to the clipboard after exporting.
- With the Ulysses note you want to publish open, bring up Alfred, type “pun” and hit enter.
Something broken for you? Report a bug on the project’s Github page!